Showing posts with label crafts. Show all posts

Monday, September 1, 2025

Artist Trading Cards August Theme Trees


I'm calling this set of five numbered cards, "Into the Mystic", yes like the song. If you know the song let it be your background music to this post.
This was inspired by a mountain morning camping at Monte Sano State Park in Huntsville, AL.  It was a misty morning and everything was sort of grey but with an excitement.

The challenge for me was to find supplies to make the monthly themed cards with, things along the way on our road trip. I did have my travel art bag but I did not have paints or inks or watercolors . I knew I had to find something along the way. And a thrift shop gave me the paints. But even when I found these paints I had no idea how I would make them work. The colors I found were black, grey, gold and color shift hot pink. That does not even feel remotely like the theme of trees. See that hodge podge in the corner?


Blending the grey and black with the pink paint, I was able to create a lavender grey base on some upcycled cardboard. In my mind this was the early morning misty day.

Ok,  so now what? Oh , wow I'm surrounded by leaves. So perfect.
I mixed the gold with some black paint and was pleasantly surprised with this greenish gold. And I used this color to paint the leaves and press them into the background to get some veiny, leaf impressions.


Since we were in the woods camping, I had packed a rosemary bush to keep outside our camper door to help keep away the bugs. A sprig of this provided additional details.
I used some upcycled plastic to help press the painted sprigs onto the background.


A little gold helps to highlight the fronds of the trees.


And the words, inspired by the morning, Into the Mystic.

With love and gratitude

Michele


Find me partying here all week, at these link parties, with some great bloggers.

Follow us out on FacebookPinterest , InstagramLinkedin, or Bloglovin .

Sunday, July 27, 2025

Greeting Card and Seed Packet Set

Saving seeds from my plants is a favorite addition to my gardening routine, but being able to share those seeds is even more fun.

I love to save seeds in pretty paper seed packets too. It just makes me happy. 
These seeds from my Texas Star were headed off to a friend so I thought let me add a quick card to take them on their journey.
I started with a blank, textured card and gave it a coat of blush pink.
Onto the card I dry brushed some gold paint to help highlight the texture and add dimension.

And I found a distressed, decorative paper with blush pink to use for the seed packet and the front of the card. 

A quick stamp.
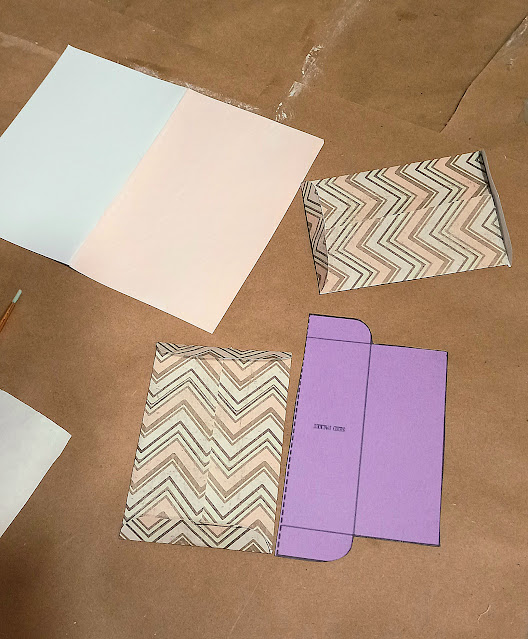
Cut and make the seed packet. You can download the packet template here . I fit two of these on a standard sheet of paper. Fold the paper and lay the stencil dotted line on the fold. Then trace and cut. Think of all that paper you have in your stash and now think of all the pretty seed packets! I mean you can use old maps , flower catalogs, old book pages, oh my.

The seed packet is easy to make. Just glue the side pieces together with a glue stick being careful not to get glue on the onside or you'll glue your seed packet closed. Trust me, I've done this. 


I used a coordinating polka dot paper to back the image for the card and I used a brown distress ink to create a vignette around the edges of the card, the image and the greeting. Position and glue your pieces to the card and don't forget to stamp the envelope for a little zhoosh.


I'm not a big card maker but in this case I thought the combination of the card and seed packet made a beautiful ensemble. 
 
Wouldn't these be adorable gift items for gardeners or a garden club? 

Now, if I could get someone to make and send me one. LOL.


With love and gratitude

Michele

Find me partying here all week, at these link parties, with some great bloggers.

Follow us out on Facebook, Pinterest , Instagram, Linkedin, or Bloglovin .

Wednesday, January 22, 2025

Monday, September 30, 2024

Mummy Bowl Fillers


If you are anything like me , you spend a lot of time perusing Pinterest. It can really spark some ideas. Well, that's exactly where this idea came from. It's my interpretation of a photo of Mummy Bowl Fillers. Here's the inspiration photo and a link to the Etsy.
(This is the inspiration piece)


Supplies
Foam Balls (various sizes)
Athletic Tape -white 
Black Floss 3 strands
Needle 
Black Buttons(googlie eyes would be cute too)


Here's what I did 
1. The athletic tape is sticky so it's perfect to wrap around the foam balls. No glue needed. I mean does this get any easier? Wrap the balls. Ok that sounds weird. Haha. 
Use  the warmth of your hand to smooth the edges into the ball. 
I purchased this at #DollarTree


2. Next, I took the black floss and sewed on a mouth . I was careful to not sew into the ball and careful to catch just under the athletic tape while sewing. Heads up, because the tape is sticky your needle will become sticky. You can clean your needle off with nail polish remover. To sew the mouth, I create the long line first and then added my vertical stitches.

3. Glue on some buttons. 

4. Arrange in a bowl or tray for a cute little addition to any room.
 
5. Add a few more themed goodies for effect. I made a few wooden pieces. I create a printable in publisher and simply cut and pasted to some painted wooden bits and pieces. Here's the printable. You can right click on the image to save to your computer. Then go in and print from your computer. The # 31 was a design I found on Pinterest.
These really bring the season. This little pop of whimsy makes me smile. 


01 09 10