Thursday, January 31, 2019

Funtastic Friday 213

Funtastic-Friday-Poster 600

FUNTASTIC FRIDAY 213 LINK PARTY

Interested in hosting a link party? We’re always looking for bloggers to join us as party hosts. If you’re interested, get in touch with me or one of the hosts.

Meet the Funtastic Friday Party Hosts

We’d love it if you followed us on social media.
MOST VIEWED

HOST FAVORITES

Heidi's favorite - How To Make An Easy Heart Box for Valentine's Day @ Celebrating Everyday Life

Michele's favorite - Washi Tape Storage @ The Scrap Shoppe Blog

Donna's favorite - Kitchen Organization - 25 Things to Declutter Right Now @ Making Home Base
Cinnamon Roll Puffs with Caramel Apple Glaze on plates
Sherry's favorite - Cinnamon Roll Puffs with Caramel Apple Glaze @ Across the Boulevard
If you were featured, take a second and tweet.
[bctt tweet="I was featured at the #FuntasticFriday link party!" username="olivesnokra"]
If you’re linking up and joining the party, please grab a button or link back to “Olives & Okra” or one of the party hosts (copy and paste the code below the button onto your blog text tab or text widget):

Easy Peasy Pleasy
If you’re a featured blogger, please grab a button to place on your blog (right click on the image and save the image to your computer):

Funtastic Friday Featured Blogger
All contributors who link up to the Funtastic Friday link party can join the Funtastic Friday group board on Pinterest. Follow me on Pinterest and leave a comment below that you would like to be added. We will also share your post on social media if sharing buttons are readily available on your post. Help grow the Funtastic Friday Link Party. Tweet about the party, please!
[bctt tweet="Add your link! The #FuntasticFriday link party is live!" username="olivesnokra"]
Disclaimer: By submitting a link to this blog link party, you are giving me permission to share and/or feature your blog post and image on social media and on my blog, Olives & Okra. All links shared will either link back to the blog hop (linky party) or to your blog.

Funtastic Friday 213 Link Party Rules

  1. Post as many links as you like
  2. Family friendly posts only
  3. Old posts are welcome
  4. Comments are greatly appreciated
An InLinkz Link-up

With love and gratitude,

Michele


Find me partying here all week at these link parties with some great bloggers.

If you are in Myrtle Beach come on down and visit us at the Coastal Bohemian Studio or check us out on FacebookPinterest , Instagram, or  G+ .


Valentine Banner


I love Valentine's Day, all those red hearts and red roses make me incredibly happy. 

Here's a banner I made to celebrate Vday.


I pulled the heart cards from  a deck of cards to use as a base . From there, I continued to build around the cards . First I stamped and embellished the cards and then punched holes along the top for the twine.
This fabric was part of my stash and I saw an opportunity to use these panels . I folded the panels and glued them to the twine in between the cards.


A love note embellishing the banner. 
See the tutorial to make this here.


This was my work station ...hung between two posts down at the studio.


Lace and bits of fabric tied between the panels and the cards and added to the bottom of the cards where I had punched a hole.


 A happy piece celebrating the season of love and look at those red pom poms.

 Above my desk it brightens my day. 
It really doesn't take much now does it?

I hope this inspires you to make a pretty red banner and I hope it makes you happy when it's hanging in your home.

Hop on over to Bring on the Crafts where you'll find more inspiration for crafting with paper. February is o the month we chose to create using paper. Have fun. 

Bring on the Crafts 700 x 550

Bring on the Crafts — A Craft & DIY Blog Hop

On the first Wednesday of each month, a group of DIY and crafty bloggers join forces. Together with hosts Marie from The Inspiration Vault and Habiba from Craftify My Love, they bring you the #BringontheCrafts blog hop. Each blogger creates a fun craft or DIY project to share that follows a monthly materials theme. February's theme is Paper! Each blogger chooses their own craft to make as long as they love it and it uses paper in the project.

Our February Co-hosts

Join in on the fun! If you'd like to participate next month, you can request to join our Bring on the Crafts Facebook Group. Next month's theme is Mod Podge!
Not a blogger, but a creative mind none the less!? Don't worry, Share your awesome creations in our Craft Cult Facebook Group. This is also a great place to ask craft & DIY related questions and find inspiration for your next project.

Now let's see all of those amazing Craft and DIY Projects!

Inlinkz Link Party


With love and gratitude,

Michele


Find me partying here all week at these link parties with some great bloggers.

If you are in Myrtle Beach come on down and visit us at the Coastal Bohemian Studio or check us out on Facebook, Pinterest , Instagram, or  G+ .

Sunday, January 27, 2019

Upcycled Carpet Runner


I had only just a month ago purchased a carpet runner to cover up the white carpet in our condo. It was to help protect the hallway at the entrance. In a month we were having the carpet removed and new flooring installed. 
So now I'm left with this runner that is too big to put anywhere else. Can I upcycle a carpet runner? Let me think about this.

It can be done and it was easy enough for me to pull off on my own.  If I get another few months out of it perfect . It's currently at the foot of the bed in the spare bedroom covering the white carpeting in that room. Don't ask, I did not choose this white carpet. It was brand new when we bought the condo.


 Using a box cutter and a t- square I took off some carpeting from each side.


Next I found some scraps of fabric from around the studio. I know I should have chosen a sturdy commercial fabric but you know me, I'm a hippie, I go with the flow and what was flowing was this polka dot piece. 

I cut enough to create a thick binding.

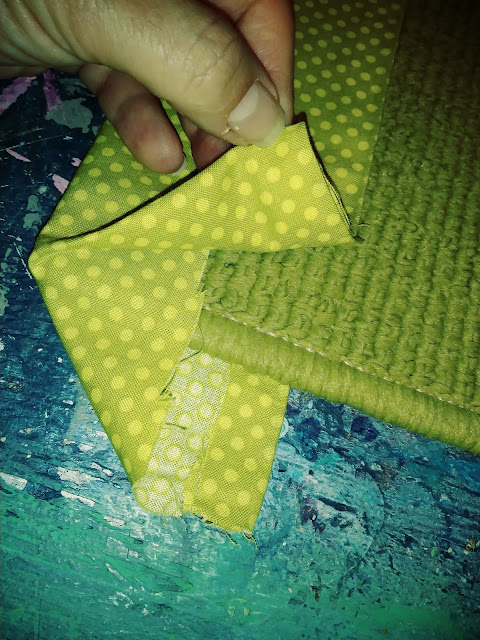
And I left 3 " overhang that will eventually be tucked and glued inside. 
Did I mention I used hot glue gun for this project. I know probably not the best idea but we only need a few months with this carpet.

I ironed the fabric before I started to work with gluing it.
I folded in a crisp clean line on both edges and glued in place with,....yes hot glue. There it is hot glue.

I sandwiched the binding between the carpet and glued it down leaving just the open edges of the 3" unglued.
 Then I tucked my edges inside and glued those down 


I decided that I needed a small pop of color to help blend this into the room I was going to place it. The room has some hot pinks and I just added a few dots of hot pink acrylic paint to the carpet. I know I should have used fabric paint but I didn't have it and I wasn't going to the store for it now.


Here's what the process taught me.  That I could customize a simple runner or carpet. I could design my own hippie piece with a carpet store and have something unique and altered by me. When it comes to carpeting, I no longer have to accept what's on the market. I can let my imagination go wild and have the professionals handle it. 

"Oh, the places we will go"

 Thanks for indulging my out of the box ways. 


With love and gratitude,

Michele


Find me partying here all week at these link parties with some great bloggers.

If you are in Myrtle Beach come on down and visit us at the Coastal Bohemian Studio or check us out on Facebook, Pinterest , Instagram, or  G+ .

Saturday, January 26, 2019

Cabinet Door Decor #Upcycle


Because I have the art studio I receive a good amount of donations from people who know I really like to upcycle. I had received  a few sample cabinet doors recently and decided to play one day. 


Here's what happened.

I like to start with a few layers of chalk paint 
And I like to to look chunky and thick and imperfect, meaning I like to see the brush strokes and stippling.

Using a vintage book page as a background I  stamped a design of nautical images.I used Archival Ink to ensure a permanent image.  Then I used matte Mod Podge to apply it to the inside of the  frame and left it to dry.
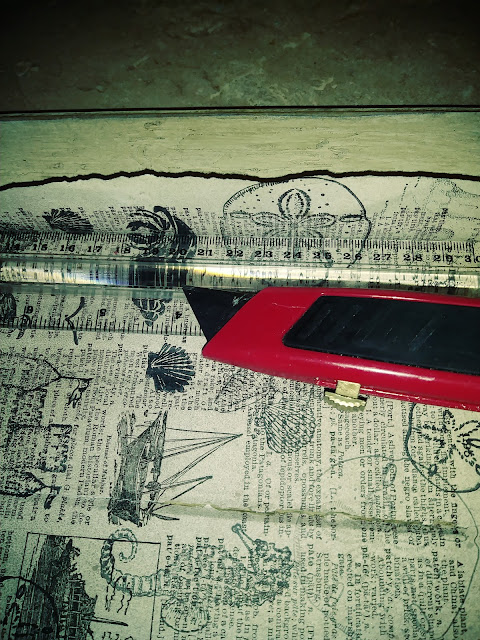
I left the edges to cut after the paper was dry.

It was simple to use a ruler as a straight edge and a blade to remove the extra paper along the edges.

Pretty enough background but now what. And this is how it goes right. 
As I wonder what the next step is I notice this...... a very noticeable inconsistency in the pattern. If I don't fix this , my brain will never accept this project.  I found the smallest of stamps and managed to blend in a few images. 

By the way are you noticing that at this point I used some dark wax to soften the white paint and bring out the crackling of the paint. I'm totally gaga for the effects of the paint and the wax. This is looking warm and weathered and vintage and lovely.
Ok, so here it is... I went simple. A pretty little starfish helps complete this piece. 


FYI . I  use Chalk Country Paint Crisp Collar with Fiddes and Sons Dark Wax. This wax is the most wonderful product. I've tried several waxes and nothing compares to this product.


With love and gratitude,

Michele


Find me partying here all week at these link parties with some great bloggers.

If you are in Myrtle Beach come on down and visit us at the Coastal Bohemian Studio or check us out on Facebook, Pinterest , Instagram, or  G+ .
01 09 10