Pages

Tuesday, August 22, 2017

Embellished Envelopes

When is the last time you sent a love letter, a note to a friend, a get well wish in the mail? You know , by “Snail Mail”?Here’s an opportunity to spend some time creating stunningly beautiful , embellished envelopes that incorporate some of the typical mixed media tools and tricks.

Attendees will make and take 2 completed envelopes by the time they leave the class. Think of the gifts you’ll send in these yummy little goodies. Who wouldn’t want to receive a card or a note encased in a work of art.


Just consider embellishing your holiday cards....OMG!OMG! OMG!


This is a fun and happy class being taught by our teacher Kat. Kat has many years crafting and has a specialty in mixed media art.
Just know it’s a safe environment to let your imagination be free. You’ll see there are no mistakes when you are creating and nothing to be afraid of when you are in good hands with Kat, at the Coastal Bohemian Studio.
Attendees should call or message 631-245-2674 to reserve a seat for class.

Monday, August 21, 2017

DIY Rag Rug Tutorial

Rag Rug Tutorial


I’ve admired handmade rag rugs for years in many styles, sizes and colors. I’m a crafty chick. I know I can make one. I just need a little guidance. Pinning around on Pinterest one day I got to pinning a few tutorials. Eventually, I knew I’d get to it. Gotta love Pinterest.


Opportunity presented itself last October,when we were evacuated from Myrtle Beach due to Hurricane Matthew and we headed inland to my finance’s family. Hunkered down I knew I needed a creative task to keep me busy.
I bought a 5' x 8' non slip rug pad used to keep throw rugs in place or to keep them from slipping about. These non-skids have an open weave of small squares just the right size to pull through fabric scraps. (For the record, I did not use fabric scraps, I used fabric at $.99 per yard from Walmart.)

I worked most of the time with the non-slip backing at its full size thinking I was going to make a 5' x 8' rag rug. In the end, I made a 3' x 2' and it’s a great size throw rug for the foot of the bed or at the bedside.


Around the shortest side I began weaving 2" x 4" strips of fabric. Oh, did I mention you should cut up your supply of fabric in strips 2"x 4" inches. I did not measure these perfectly either, I am not the perfect crafter, I am the “Let’s get this done crafter”. Cut a row of 2” strips from your fabric and use the first one as a template to cut the others. No pinning, just quick cut the fabric. It’s not going to be perfect but that’s perfect for this rag rug.
Cut a 4” strip from the 2” strips and you have your 2" x 4" template. Cut your 2" x 4’s pieces that will be used for weaving.
I don’t use grids and wheels and all that fussy stuff to cut . I would not get anything done.

 Imagine 3 squares in a straight line.
Weave one piece of fabric, by hand, down into one square leaving square #2 open or skip square number 2 and pull your strip up though square # 3. Pull the fabric taut and even it out on both sides.  

You do not need to tie the fabric, no knots needed. Eventually, the fabric becomes condensed as you continue to weave and it’s rare to lose a fabric piece. If you do lose a piece, weave it back into the rug.
Continue weaving in this way, but leave one empty square between sets of three squares along the 2' rows until you reach the size you like. 


While weaving leave a blank row between rows.
 I usually fold the entire row along the # two square, making it easy to pull fabric strips through squares 1 and 3.
Cut the excess padding once you reach the size you like. Done. 


Here's what the back will look like.


I am loving this rag rug. 

Next , a braided rag rug and I've been saving my scraps of fabrics and old t shirts this time.

Thx for reading along.
Michele 
Where I party


Mrs Meyer's Clean Day Geranium to Treat My Menopause.


If you are a woman of a certain age, possibly menopausal, then you need to read this and then immediately order yourself and your girlfriends a few bottles of this magic potion. I am not kidding.
I can't stop cleaning my house and my car. Ok, it's not potion so don't drink it.

I began cleaning with Mrs. Meyers' "Geranium" all purpose cleaner when we were away in Florida. I picked it up at the local Publix. I enjoyed the smell so much I mixed up a bottle to bring back home to South Carolina. In the end I forgot it and that's when the story gets good. I ran out to my local Publix to grab another bottle. I am a cleaning fool for this stuff, happily finding things to spritz and wipe and spritz and wipe.
Now, off to NY I go a visiting and while I'm there I need to get me some Mrs. Meyers so I can clean something. Is that normal? The answer is no. What the heck is wrong with me? I get that I am jonesing for some Mrs. Meyers.  
No Mrs. Meyers Geranium to be had and no Publix in NY .
Not the end of the world right? But everyday I wake up thinking of the Mrs. Meyers and how I was going to hit another store in search of some more of my "Geranium" scented crack.

Somewhere along the line while blogging, I happen to catch an article that mentions, get this, Geranium is good for menopause and hormone balancing. Ding. Connect the dots. My body wants what it needs and has been looking for it. Hence, the "Geranium" scented crack. My body wants Mrs Meyers Geranium scented all purpose cleaner, there's no doubt in my mind.


Mrs. Meyers mentions nothing specifically about menopause and hormone balancing on the label of her divine, sweet scented cleanser. The bottle does specifically state Aromatherapeutic, which in itself is fantastic and used for many wonderful and amazing things, but come on Mrs. Meyers your marketing department missed a big one here. Aromatherapy aint' got nothing on "Cures Menopause" or "Soothes Menopausal Symptoms" or "Menopausal ? Clean with this !" or "Sweat less Sleep More Cleaner".

I haven't actually tested it for sleeping but, my bedside table is getting a good spritz and swipe tonight.


"Its effects on infertility and menopausal symptoms make it a particularly useful oil for women." Read more http://www.thearomablog.com/geranium-essential-oil-for-balance-and-beauty/

Particularly useful is an understatement.

Here is a link to Mrs. Amazing Meyers Geranium scented products. 


She does know something, because  she has "Geranium" scented dish soap, hand lotion, bar soap , laundry detergent, fabric softener, dryer sheets and candles. Hello, can I get some deodorant? 
She even sells gift sets. 
Wink wink family.


This post was written to help all of those who suffer with menopause. 
Using this product may cause  happiness, sleep, cool dry pits and a clean home. 


Your friend 
Michele 
 I am not paid by  or sponsored by the Mrs. Meyers Company in anyway. 
This is my experience and I believe it to be true.

Wednesday, August 16, 2017

Junk Journal


I caught a tutorial on Junk Journaling and thought  "Well, now I can clean up some of my junk I've been keeping around the studio."
  Gather up that broken jewelry, those findings you bought on sale at Michael's,  broken pieces of things you never repaired, keys, seashells, etc. and see how easy it is to create a one of a kind Junk Journal.
(I even used failed and over cooked clay tile pieces ,broken belts , fabric bows etc.) You'll see below in the video and the pics.
It's best to gather up more junk than you think. More than likely , however ,you won't use it all.


Here is what I gathered up for the event.


Get started by protecting the journal by adding newspaper or wax paper sheets inside the back and front covers to protect against paint and glue spills. This is a messy project. 
Give your journal cover a quick coat of Gesso.
After that dries you can start assembling pieces randomly. 
Try to start with some of your flatter items that will help add some character to your background. Using your hottest glue gun, start gluing the items to the base/cover and continue to layer and layer and layer. 
I was trying to make that heart work but in the end it didn't make it to the finals.


Trim everything down that is hanging over the edges

This was my final assembly before I covered it in Gesso.
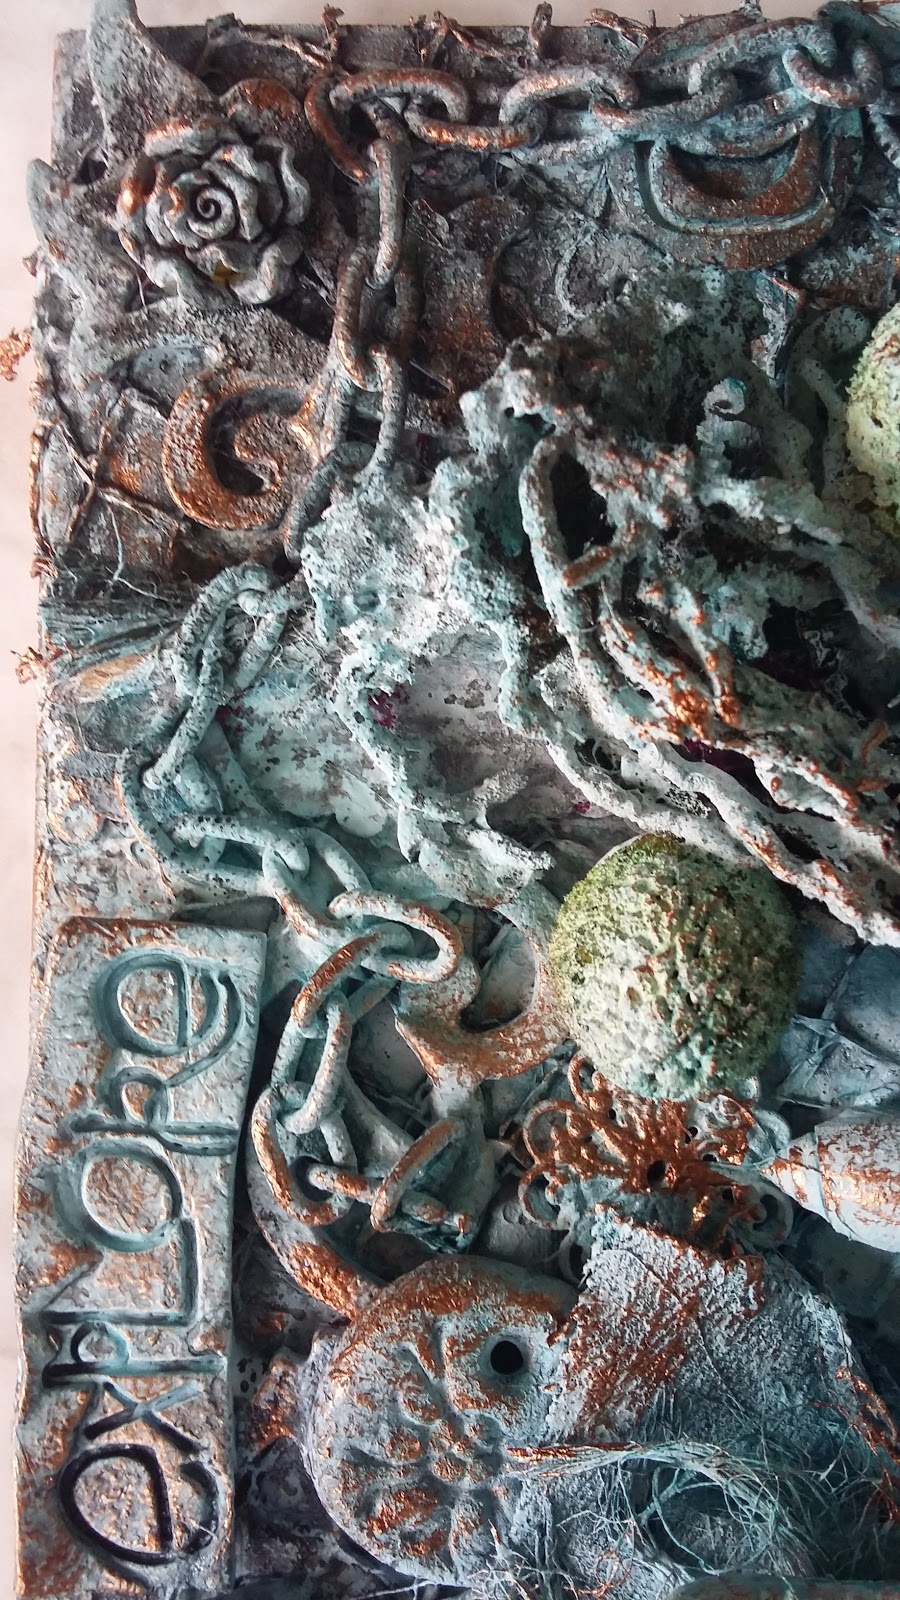
Crazy right? Now it's time to coat the whole thing in Gesso. Using a brush, just put a generous coating over the entire assemblage , making sure to hit all the little nooks and crannies. Afterwards, I sprayed with Dylusions to get the blue and turquoise colors. 
 Dylusions
Next you'll want to dry brush with a bit of copper craft paint over the entire project. You could go gold or silver but I'm such a sucker for the copper.
In the end, I sprayed 2 coats of flat clear coat to help everything stay protected.
 Flat Clear Coat


Isn't she lovely, isn't she wonderful .....


Many thanks for taking time to read along.

Michele

Coastal Bohemian


Tuesday, August 1, 2017

Faux Fish Prints

Have you ever heard of Fish Prints ?

I fell in love with fish prints after visiting a  Montauk, NY street fair where I saw some of the most beautiful fish prints of Blue Fish, Octopus, Sea Bass etc.
BTW, fish prints were a form of recording the biggest catches in a time before we had cameras. See, they had to document their big fish tales.

Since we are a family of fishermen, I was fascinated. Next time we caught fish I was prepared to capture the prints of our fish.


For some reason I am fascinated with Kissy Fish. Our first Xmas together I bought my fiance a "Kissy Fish " ornament . Now I paint them.
Sitting around looking at a blank canvas the other day I began an outline of a fish. In my mind I didn't want to create a typical painted fish. I could see the fish prints in my mind and the  lovely textured scales and tails.
 Today 's Kissy Fish took on a new look with sea sponge painted 
texture and maps for her fins .


She is a true mixed media Coastal Bohemian.
Stay tuned for more Faux Kissy Fish Prints. I'm addicted. 
Looking forward to creating new prints with various stencils and more.


Thanks for following along .
Michele