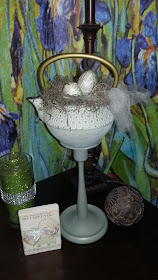
Forgive me for only having the finished product but my directions are simple enough for you to recreate this yourself. Again, if you've read some of my other posts you know I tend to dive into a project like a mad scientist once the idea hits, forgetting to take pictures of the before.
This is a teapot from World Market similar to the ones used here also from World Market. I re-purposed mine as they had become very damaged inside . They sat around my studio for a long time and then I got to thinking about the teapots one day . I was trying to create a faux bird nest when I looked over at these lonely teapots that where begging to have a new life. And what a new life they have.
There are a few pics that seem similar but I'm trying to show different angles and capture the nest and eggs so keep scrolling.
 I added newspaper inside the nest to give the nest a slight base. I added some hot glue and inserted my nest. After , I took some Dollar Tree eggs and old book pages and covered the eggs with the paper mache . I used my paint brush to get them nice and evened out around all those edges. This was a very messy hand on event. I even tinted the pages on the mini eggs using a watered down Mossy Green from Martha Stewart acrylics from Walmart.
This picture is an awful picture of the glittery foam eggs I used but I pulled this from Amazon to show you what kind of eggs I used. I wanted a solid egg and not the collapsible fillable kind.
I added newspaper inside the nest to give the nest a slight base. I added some hot glue and inserted my nest. After , I took some Dollar Tree eggs and old book pages and covered the eggs with the paper mache . I used my paint brush to get them nice and evened out around all those edges. This was a very messy hand on event. I even tinted the pages on the mini eggs using a watered down Mossy Green from Martha Stewart acrylics from Walmart. This picture is an awful picture of the glittery foam eggs I used but I pulled this from Amazon to show you what kind of egg I used. I wanted a solid egg and not the collapsible, fillable kind.Make sure to snip the ribbons off before attempting the paper mache.
I used an old candlestick as a pedestal and using E6000 glue placed the lid from the teapot upside down onto the candlestick . The small knob on the lid gets set into the cubby of the candle holder. This now acts as a more reliable footing to adhere your teapot. Glue your teapot to your new base and allow to dry. Bingo. You are done.
 In the end I gave the green one away as a gift but not before adding the word nest right on the front of the teapot . I had ripped around the edges of the word NEST and decoupaged it onto the front. I finished it off with a faux bird from the Dollar Tree. I'll see if I can get a photo of that to add to this post.
Thanks again for reading and I hope you are enjoying the Spring weather.
If you like this post you may also like Love Birds
Michele Michael
Coastal Bohemian
www.CoastalBohemian.net
Don't forget to like us up on Facebook to follow along with all the creative goodness down at the studio.
You can find me blog hopping all week here.


