Pages

Pages

Monday, October 30, 2017

Upcycled Verdigris Garden Statues

We've all had these garden statues out in our yards over the years in different forms and sizes. Over the years they get weathered and distressed and can look a bit sad, enough so to possibly toss them into the trash. Here's a quick makeover I did for a friend recently. She was moving and I knew her mom had given her these statues and I wanted to give them a  new life. (She was considering leaving them behind because they were so ravaged by the weather.)

Grab a paper plate and add some craft acrylic paint in Copper and a few drops of water to thin it out a bit. With a very wet brush coat the entire statue.  You will see through some of the paint in striations and this really lends itself to the piece.  And if you get a few drip marks let them be. (Just a few).
We are not looking for a complete thick coverage here. Let it dry. Using a dry brush technique with some verdigris color of paint dry brush onto the areas you think would be most affected by rain and winds. Places that jut out and the upper most parts seem to be the weathered areas.  This will soften the look immediately. 
I purposely do not add protective sealants. I want the weather to soften the paint look more . We are looking for this 


Found in a google search "Copper Statue Patina"
Look at the drip marks. Yummy.


 I used Nicole's paint in Copper from AC Moore and it's a fantastic paint for this.


Quick and easy upcycle and my friend is thrilled. She made me leave the copper painted one just copper. They actually sit on her screened in patio where she meditates so they will see a lot more life and love this  go round.


Thanks again for checking things out over here at Coastal Bohemian.


Michele


This is where I post all week for link parties.

Wednesday, October 25, 2017

Worn Denim Jeans Furniture.

Think of your favorite worn in, worn out, weathered and  distressed jeans . Recolor that image with Midnight Blue from your childhood Crayola crayon box. That's what we have here.
This image does not reflect that deep, midnight blue with that hint of emerald, but I can tell you in person this color is glorious. I started by using Riptide by Chalk Country Paint.


Before video.


Here's the before picture of a piece I picked from the side of the road a few years ago. Finally, it's time to paint something for me. Yippee.

 I used a paint technique I saw on Debbie's Design Diary on Youtube that uses a two color technique, a spray bottle and a pallet knife. Not your typical. Now I have used the pallet knife to scrape furniture and drag paint. Here you use the pallet knife like a paint brush would be used to highlight or enhance an area. 

Check out Debbie's Video here. 


It begins with two coats of Riptide. Easy enough.
Next we take both Riptide, on one brush and Polished Turquoise , on another brush and begin a blending of colors. Start with the Polished turquoise on the inside of the section and swirl it on and spray it with some water. You'll need to dip into the Riptide at this point and start to blend it into the other paint . Now give this a light spray and continue to blend. Bring in your long brush strokes to create the striations, not sure if that word is what applies here but I'm using it.You're trying to get a natural color blend without creating a new color. Sort of an hombre. Debbie describes it as a blending as you would use when applying eye shadow.


After I painted the piece, I mixed together some of  the light and the dark wax and gave this whole piece a good wax and buff, further aging this table.
https://www.facebook.com/michele.michael.315/videos/vb.100000219204424/1950431198307501/?type=2&video_source=user_video_tab

Here's my after party video.


Here's where I party all week.


Thanks for reading along . 


Michele 
Coastal Bohemian

Monday, October 16, 2017

Caribbean Sea Chalky Painted Pieces


Being at the beach in South Carolina  I see many people coming down to retire from up North. They have very traditional furniture, usually dark and wood and many of these pieces are absolutely lovely pieces of furniture but they no longer define their owner. That where I come in.

I've been painting furniture for over 26 years. In the last several years I've been painting with Chalk Country Paint brand which I sell down at my studio and also, where I give chalky paint and distressed paint classes.


 These are a few pieces I painted for a couple that moved down to Myrtle beach from up North. The wife was reluctant to have the pieces painted but the husband was ready to lighten up the house. It's usually the men who don't want to paint the wood. 
Women usually need to change the look and come hunting for some chalky paint but I find the men love and connect with the look of wood and it's very difficult for them to make such a dramatic change over to painted furniture. It's  a boy thing.


We decided on Caribbean Sea Chalky Country Paint . It's a soft blue with hints of slate . It's the color I call, "Myrtle Beach Blue", because so many people choose this as their color when they decide to move into the painted furniture arena down here. 
 Caribbean Sea is a great way to bring a pop of color into the home without the shock. 


This client wanted to change the knobs and hardware but I like the painted pulls and knobs that were original to the piece and convinced them to try the painted hardware. In the end, they could always still buy new hardware if they didn't like it.


My client picked up his pieces and admitted that the distressed painted hardware looked great with the piece. Everyone was happy that day. This furniture has a new life ahead and I helped to set it on it's way. That makes me happy. God I love furniture .


Thanks for popping in to see my latest project.

Michele 
Coastal Bohemian


As a form of online networking, I participate in link parties daily. It's actually thrilling for me to learn about all these different bloggers and often times I am inspired by them in my own life and business. It's been a gift for me to participate. 
Here 's a link to where I party all week.

Monday, October 9, 2017

Halloween Blocks

These are Halloween blocks . Great for shelf sitters, gifts, hostess gifts or for your Halloween tablescape.


I have made these blocks before in a Blog post titled, Thanksgiving Blocks. I'm swapping out the info so you have info and links to make these Halloween Blocks . 

I went to Home Depot and bought some of their discounted wood , took it back to my shop and cut it to a size I thought made a nice set.  I bought 1" x 6" and 1" x 4" boards.  I did 
5" x 7" boards and 3' x 5' boards. (The boards at HD are actually milled smaller than their listed sizes so a 6 " board is actually 5.5" which was great for my publisher layout.)


I used some Fiddes Rugger Brown wax to give the wood some depth and color. Apply wax by brush , wipe off excess and then buff .


Wax.  


Buffed.

Instead of cutting the images from the paper I like to tear around the images to cut them out. I age them with the brown wax used in the same way described above. This seals in the ink so you can decoupage with out any ink bleed onto your project. The brow wax will get your edges perfectly aged and shabby looking. 

After that we decoupage the images to the wood.
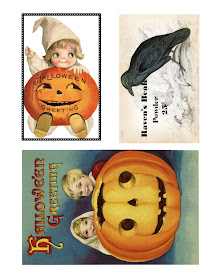
 Download Halloween Images here


Add some accessories  like bows and bling for eyes. 
Done.
To me this looks like something I may find in a hometown gift boutique. I love to wrap these up with tissue paper and a small gift bag for gift giving. 


Hope you are enjoying your fall and I hope you enjoyed this craft project.


Michele 

Here's a link to where we link up all week. Just take peek.


Monday, October 2, 2017

Chicken Coastal Bohemian


Chicken Coastal Bohemian

Ingredients 

1 lb. Boiled and chopped chicken breast
1/2 cup chopped parsley
1/2 cup dried cherries
1/2 cup unsweetened flake coconut
1/3 cup pepitos (pumpkin seeds)
1/3 cup walnuts, chopped or not
1/3 cup pecans chopped or not
3 Tbl Olive Oil
3 Tbl Coconut White Balsamic Vinegar (What?)

This is an elegant yet simple recipe that I love to make at least once per month. It is certainly more of a spring , summer recipe however no one is going to stop you from eating this lovely mix of goodness.
Chicken Coastal Bohemian makes a great presentation at garden parties, bridal showers , birthdays, luncheon, and most especially beach blanket picnics. Weddings too. Just made this for a garden party wedding and everyone is on me to get them the recipe.
My boyfriend and I like to cook together and we always plan our weekend get aways and rides along the shore to include little plastic containers of our homemade goodies and this is usually one of them.

I buy chicken cutlets on sale and then put them in little bags and freeze them for all my little meals.
You can also boil all the chicken when you buy it on sale and freeze that for easy use in this salad.
Just boil the whole chicken cutlet with salt and pepper in the water. Chop it up into small pieces 1/2"- 1 "
Using a large mixing bowl add chopped parsley, dried cherries, coconut, nuts, oil and vinegar . Mix well. Salt and pepper. Mix well. Serve with Trader Joe's Pumpernickel pretzel rod for a little something different. Yum.
It gets better if it sits overnight.


Coconut White Balsamic Vinegar- How do I find that? Go to a specialty Olive Oil shop or order online. Here's a link to one http://www.beacholiveoils.com/product/tropical-coconut-white-balsamic-vinegar-375ml/


Alternatives- I'm the type of person who uses what's around the house. If you have fresh cilantro substitute it for the parsley  or even add that to the existing recipe . I have even used finely chopped arugula like an herb. The nuts are always easy. I keep a variety around and use what needs to get used up or whatever I'm feeling. Some days I add sunflower seeds or almonds . It's up to you but know that you can change things up.


Hope you enjoy .

Michele 


Sushi Costume


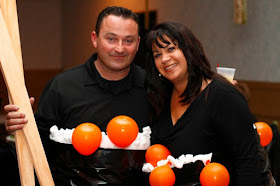
About eight years ago I was dating my boyfriend Jason for 1 year. We were invited to a Halloween /Birthday Party / Fund Raiser and we had to dress up.

This made me a little nervous because I realized I really didn't know if Jason would dress up.

Reading through Woman's Day magazine I found a costume for children to make them look like Sushi. Easy Peasy. This is it!

Here's the thing, my little brain is racing around, doing the happy dance because I know Jason loves sushi.How can he say no?

Here's the call.

Jason calls from work to say hello on his break.

Me: "Babe, we got invited to a costume party and we have to dress up and I really have to go to this event for business and networking."

Jason : "Ok." (Not just OK , OK with a bit of trepidation.)

Me: (They used to call me Motor Mouth when I was a kid so you'll have to imagine the verbal run on sentence here and lots of happy excitement.)
"Babe, we're dressing up as Sushi, don't say no , don't be afraid, just wait until you see the costume and you'll see it's actually perfect."

Jason : lol.

Jason to his men."Hey guys, I'm dressing up as Sushi for Halloween"

That is why I love this man. He's pretty much game for everything.

See pictures above for our sushi rolls costume .

What you'll need
4 pillows
clear packing tape
packing corn
4 black bags
Glue gun
orange balloons.
2 -6' pieces of wood from the lumber yard( If you ask nicely, they'll probably cut the sticks to look like chopsticks for you.) They cut them for us because they know us in the neighborhood and because we promised a picture of the costume for their laughs.


1. Sandwich your body between the two pillows and tape the pillows to your body.
2.Wrap the plastic bags around the tape creating the seaweed roll. You may have to open your bags up a bit to create the right size.
2. Hot glue white packing corn onto the top of the pillow that is peeking out to create the look of rice.
4. Blow up orange balloons small and tie ends. Hot glue onto rice and pillow creating the salmon roe.

Done. Carry around your chopsticks for effect.

We actually went into our favorite sushi joint and pranced around for the crew and the patron. Everyone had a big laugh.


Happy Halloween friends. 
Michele 
Little miss Sushi Bohemian

Here's a list of link parties I participate in weekly.


Wednesday


Boo Blocks


Good morning folks. This is an amended Blog post of a quicky I did a while ago.  It's really just some simple mixed media. This is also a class we teach down at Coastal Bohemian.

We do USA blocks, LOVE blocks, Boo blocks , Sea Blocks, Joy blocks and eventually more. I now keep a steady supply of blocks down at the studio and also for sale so students can go home and do more with their own ideas.

These are pretty easy, if you can cut your own blocks. You can always  have someone or someplace cut the blocks for you. A lumber yard will probably cut for you. 


I buy fence posts that are 4" x 4" and either 8 or 10 ft long.  


Cut them down to a 4" height. 
There is the cube, the block. Blocks will be painted on top and bottom and on two sides.
I like to dry brush orange , black and white on a few sides and of course paint a few sides solid. 


The two other sides get decoupaged vintage papers, napkins and creepy cloth . I use Halloween themed napkins from the Dollar Tree.


 After all the sides have a background, you can decorate each block as a different letter  to spell BOO. One becomes the "B" block, one becomes the "O" block and one becomes the "O "
block.  Use whatever you can find from the Dollar Tree to form a B.


Here I used bugs and freaky eyeballs. You'll need to cut the open the eyeballs up along the seam to use half.


I used an "O" stamp for the the letter "O", but I made each one into a scary eyeball by cutting it out from crazy papers and adding color and speckle to the stamp.


Add some dimension by adding adhesive backed pads. 


 There are 4 sides to each block so you have a variety of arrangements including stacked. 

These make a great hostess gift, tablescape , or  a perfect entryway greeting. 

This is an easy craft, just a little more time consuming. A newbie may have a challenge with the decoupage.

Thanks again for reading along. 


Michele 


Don't forget to find us partying  here all week.